Friday 6 November 2015

Supremely awesome chair yoga


Seated yoga is brilliant if you don't have time to get your mat our or if you're tight while travelling or at work. Take a few minutes to work through these basic seated yoga postures to feel refreshed and ready to kick some ass! Always be careful, especially if you have an injury or any medical condition, be patient with your body and let your breath flow deeply and effortlessly to ease the mind along with the body. Have fun! 

Sanskrit names
  • Surya Namaskar (Sun Salute) 
  • Eka Pada Rajakapotasana (Pigeon pose)
Benefits
  • Increased body flow around the body
  • Better lymph drainage, especially in the legs
  • More efficient synovial fluid in joints  
  • Decreases chance of headaches 
  • Reduces upper back, chest, neck, shoulder and hip tightness
Cautions
  • Make sure you use a full, deep belly breath as you move through these postures, but don't hyperventilate
  • Don't move into pain, always make sure you are comfortable but are challenging yourself 
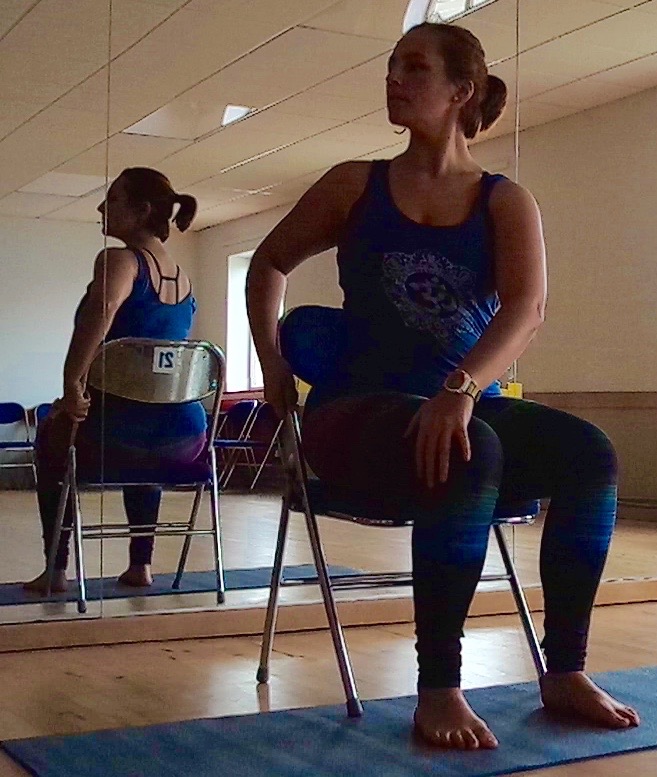
Surya Namaskar


INHALE to lift up. Brilliant first thing in the morning.  
EXHALE and fold forwards 


  • Sit on a chair, legs at 90* and feet planted hip width. 
  • INHALE lift the arms over head, lift the chest and look up, stretch up as tall as you can.
  • EXHALE bring the hands down to the thighs and trace the hands down the legs until they touch your shins, toes or the floor. 
  • Let the belly tuck in deeply and drop the chin to the chest. 
  • INAHLE and reach the arms all the way back up, repeating the sequence.
  • Move with the breath and repeat anywhere from 3-10 times.

Eka Pada Rajakaptoasana

Seated Eka Pada Rajakaptoasana
Deepening the stretch.
A must when travelling on a plane. 

Knee hugs are always good after a big stretch!


  • Sit on a chair, legs at 90* and feet planted hip width. 
  • Take your right ankle on top of you leg knee. 
  • EXHALE and lift the chest as you start to gently fold forward over you legs. Only go as far as comfortable. 
  • Keep the spine as tall as you can as you breathe. 
  • Hold for as many breaths as comfortably, allowing yourself to sink deeper with each EXHALE
  • INAHLE and gently rise back up.
  • Hug the right knee into the chest to release the ankle and the knee, hold for a breath. 
  • Feel the release and openness of the hips and your lower spine.
  • Repeat on the left leg when ready.

Seated Twist
Seated twist.
Great for long hours at a computer or during a long journey. 


  • Sit on a chair, legs at 90* and feet planted hip width.
  • Belly tucked in gently to help lift the spine tall.
  • EXHALE twist to the left taking your right hand to the outside of your left knee and the left hand to a chair leg.
  • Breathe here.
  • Keep lifting the chest and pulling the shoulders back. 
  • Feel tall and majestic.
  • Hold for 3- 5 breaths.
  • INHALE and gently come back to your centre, repeating on the opposite side when you are ready. 
Neck stretches

Neck stretches. Perfect for tight shoulders and tension headaches.


  • Sit on a chair, legs at 90* and feet planted hip width.
  • Belly tucked in gently to help lift the spine tall.
  • INHALE take your right arm down by your side and reach your fingers towards the floor away from your hip. EXHALE and take your left ear to your left shoulder. Only go as far as comfortable.
  • Gently move the head to gaze down at your legs to stretch down the upper back/ shoulder and gaze up to the ceiling to release the front of the neck and upper chest. 
  • Hold for 3-5 breaths.
  • INHALE to bring the head back up and rest the right arm on your thigh. Repeat with the left arm. 
  • ALWAYS be gentle with your neck. Allow yourself to be at ease as you stretch, don’t move into pain. 

Wednesday 22 April 2015

10 positive vibes

I'm very bunged up today. To the point where there a pack of tissues stuffed up the sleeve of my cardy and I sound like Monica from that Friends episode where she puts 'd's at the end of her words... "Honey, when you put a 'd' at the end of 'fine', you're not 'fine'!". But i'm going to focus on what is going to make me happy instead of letting the mucus bung down my positivity too!

1. Bella
     My lovely doggy. Playing with her, talking to her and taking her out for a walk later!

2. Sewing
     Today I plan on cutting out and make the most gorgeous dress from a stunning duck egg blue fabric I bought that has William Morris style flower growing across it.

3. Tea
     Tea always understand you when you're ill. It just knows, you know?

4. Restorative yoga
     With a few floor cushions stacked on top of each other I can rest my achey body on the floor and allow it to gently open as the cushion take the weight. Such a gorgeous practice when you don't feel 100%.

5. My Mum and my Damien
Always know when to bring me tea and lovely food and, the most appriceated, to make me laugh. A good giggle always boosts your mood when you feel a little grey.

6. My garden
Recently Damien and I layed a lawn. A whole lawn!! It grew from seeds and everything!! It has the most brilliant green colour and gently sways in the wind as its getting pretty long now :P Safe to say I'm very proud and excited about it and it's wonderful to feel the earth under your feet. A little grounding back down the the earth is always good for the soul.

7. Warm winter clothes
Ski socks + granny jumpers + wooly tracky bottoms + long sleeve tshirts = Toasty Freya!

8. Netflix
The immense library of Netflix never leaves you bored! Especially on days when you stay in bed far longer than acceptable :P

9. Crochet
Crochet is one of my favourite crafts. It grows quickly, the techniques are simple and you can create the most stunning makes in a few hours. I'm hoping to give a little Tunisian crochet a go today!

10. Tomorrow
Tomorrow is another day adnd I hope I will be a little better :)

Tuesday 13 January 2015

A yogi's best downward friend. Downward facing dog!


Sanskrit name
  • Adho Mukha Svanasana 
  • Adho= downward, Mukha= face, shvana=dog 
Benefits
  • Opens and strengthens the upper body 
  • Stretches the hamstrings, calves and back of the ankle. 
  • Strengthens the legs
  • Relieves mild depression 
  • Energises the body 
  • Improves digestion 
  • Helps flat footed-ness 
Cautions
  • High or low blood pressure 
  • Acid reflux 
  • Hernia 
  • Shoulder, hamstring or lower back injury 
  • History of stroke 
  • Pregnancy (Do not do if past 3rd term) 
Anatomy focus

  • Ankle- Dorsiflexion
  • Knees- Extension (avoid hyper extension and locking)
  • Hips- Flexion and slight adduction 
  • Spine- Neutral and Sacroiliac Joint nutation  
  • Neck- Neutral 
  • Shoulders- Scapula upward rotation and elevation with shoulder flexion  
  • Elbows- Extension (avoiding hyper extension and locking)
  • Wrist- Dorsiflexion
Step by Step

Quick tip! Downward facing dog is actually an inversion! 

  • Start on all fours and take your hands a little further forward so your hands aren't directly under your shoulders
  • Inhale here 
  • Curl your toes under and exhale as you push your hips upwards 

Now here work through each part of your body to ensure correct alignment and comfort. I use this little sequence to remind me every time I press back into my first down dog of my practice. 

    The full Downward Facing Dog asana. 
  • Check hands! Fingers spread wide, middle finger pointing forward, shoulder width apart (make sure no wider to protect your elbows) and pressing in the right places and shifting weight in the right places. 
Getting your hands right can be really difficult, but stick with it. If you're like me and didn't even realise there was anything wrong with my hands until I got a twinge in my wrist one day, practice while you are own all fours. No weight bearing in your hands and you can get the full effect of using your hands correctly.
  • From yogabycandace.com. Brilliant diagram of how to set your hand in down dog.
  • Check elbows! They should be soft, the creases of your elbows should face each other (not forwards) and you should be able to bend them. If you can't bend them you might be locking/ hyper extending. Locking/ hyperextended elbows can get really painful if you don't break the habit. Much like your hands, practice while on all fours to make sure your arms are in a lovely, strong line from your wrist to shoulder. If you are used to locking/ hyperextending it will be a lot more work for you triceps once you move your elbow alignment but don't worry, that just means you're getting strong! 
  • Check shoulders! Shoulders away from the ears and your shoulder blades sink down the back and firm against your upper back, which feels like you're trying to broaden your upper back. You might feel stretching and tensing of muscles here which is perfectly normal. This is strong work so practice, practice, practice! It'll be effortless in no time!  
  • Check neck! Your neck should be neutral, so ears are in the middle of your upper arms and your gaze is to your feet.  
  • Check chest! Your chest should feel as if it is very gently getting closer to the ground. Your chest isn't actually moving itself, its coming from your shoulder blades and upper back. 
  • Check abs! Your abdominals should be tucking in towards your spine to protect your lower back. You should be able to hold them in and still breath, so don't hold them as tight as you would to show them off, no one can see them! :P 
  • Check lower back! Your back should feel strong, sturdy and lengthened. If you have any issues in your lower back, keep your knees bent throughout your down dog practice until you are comfortable to begin to straighten them.
  • FINALLY! CHECK LEGS! To begin with your hamstring might be pretty tight so always make sure you are lovely and warm before straightening your legs fully in down dog. 
To work on the full extension of your knees we do what's called "bicycling the legs". This means to alternatively work your heels down to the floor. This stretches one leg at a time and makes it much easier to stretch both legs at once after you've done a couple of rounds. To bicycle your legs start with your right heel, exhale and bring it to the floor as you bend your left knee deeply. Inhale here and as you exhale, swap over to the left heel. This is one round. Do this for up to 6 rounds and then lift both heels to the ceiling and then draw them down to the floor slowly together. You can then work on drawing the back of you thighs away from you to further extend your knees. BREATH throughout as stretching your thighs is tough work! 
Bicycling the right heel to the ground on the exhale as the left knee bends. 

Bicycling the left heel down as the right knee bends. 

Easier Variation 
  • Bend both of your knees. This helps to protect your lower back and hamstrings and takes the weight off your upper body a little too. 

    Easier version- bend both knees but maintain your straight spine and strong shoulders.

Difficult Variation 

  • Simple really. Straight legs, fully flexed shoulders, good abdominal tucking and being able to breath effortlessly. 
Down dog is a hard posture! It takes a lot of practice and patients to be able to preform the full pose comfortably. I used to get really out of breath in down dog and still have work on my hamstrings for a long time before them fully open up to get my heels down. Practice, smile, laugh, get out of breath, practice and plenty of patience! Have fun! 

Tuesday 6 January 2015

Setting an intention


Setting intentions is a great way to help kickstart a new yoga practice or help boost a well matured practice. With the new year now in full swing, intentions are a great way to help reach your resolutions! 

What's an intention?


  • An intention is a little goal that is set at the beginning of a yoga practice to achieve within the practice itself, throughout the day or to help you live mindfully. 
  • They're like little aims that help you achieve your overall goals. 
How does it work? 
  • At the beginning of your practice set your intention
  • Gently repeat it to yourself a few times before you fully begin 
  • Throughout your practice remind yourself and continue to repeat your intention a few times, especially if your mind wonders off or you get bored/ frustrated/ upset etc. 
  • During your pranayama practice is a great time to fully immerse yourself in your intention and let yourself be fully absorbed by it 
  • Using an active hasta mudra with your intention is a great way to really reinforce it into your practice 

Little, lovely snippets
  • Yogic intentions are designed to be small and manageable. 
  • They aren't big, brassy statements that might frighten you like, "I'm going to do the splits today!", on your second ever class. 
  • They are more like little reminders. "Today I will remember to breath fully with my diaphragm" (I actually just took a proper breath after typing that :P) or "I will great everyone with kindness" or "I will continue to work on improving my hip flexibility to reach the splits". 
  • Bite size. Memorable. Little goals. 
  • You can set a new intention at the beginning of every practice or maintain the same one. It's your practice and practice what makes your soul sing! 
  • Don't bog yourself down. If you don't achieve your intention, keep practicing. Practice. Practice. Practice. 
  • Enjoy your intentions! 


Have beautiful practice today! Nameste 

Monday 5 January 2015

LUNGE 2,3,4!


Sanskrit name
  • This lunge is a variation of Warrior I so it doesn't have a sanskrit name 
Benefits
  • Stretches the front the hip of the extended back leg 
  • Strengthens the thighs, knees and ankles
  • Improves balance when practice regularly 
Cautions
  • Knees injuries
  • Balance issues 
Anatomy focus
  • Front leg- ankle dorsiflexion, knee flexion, hip flexion and nutation of the SI joint (Sacroiliac joint of the pelvis and the spine) 
  • Back leg - ankle dorsiflexion, knee extension, hip extension and counter nutation of SI joint
  • Spine- extension and slight rotation of chest to face forwards
  • Shoulders- shoulder flexion, elbow extension, upward rotation, abduction and elevation of scapular

Step by Step
  • Starting in Tadasana (Mountain pose) making sure you're standing tall, belly lightly tucking in, drawing your coccyx down gently to lengthen your back and drawing your crown all the way up to the sky.
  • Take a couple of breaths here, grounding down into the floor. 
  • Bring your hands to your hips and shift your weight to gain your balance on your left leg. 
  • Inhale here 
  • Exhale and take you right leg straight back behind you, a little further back than a natural stride, keeping your feet hip width apart. 
  • Maintain you balance as you take your arms over head and shoulder width apart.
  • Keep the belly tucked and chest lifted. 
  • Reach your fingers up to the sky as you squeeze those left quadricep muscle with all your might!
  • Gently tense your right hamstrings to straighten your right leg and secure your pelvis. 
  • Press your right heel away from you to lengthen the back of your right leg. 
  • You must keep your left knee over your left ankle. DO NOT let the knee reach forward towards the toes. If this happens, lengthen your stride instantly! Give your knee plenty of safe space to be stable. 
  • Take up to 5 breaths here.
  • To come out of the lunge, place the hands back onto the hips, bend the right knee and take your weight back into your left foot. Inhale here.
  • Exhale and glide your right foot back up to it's friend, still hip width apart. 
  • Come back into your lovely Tadasana and take a few well deserved breaths. 
  • Repeat by taking your left leg back when ready.  

Lunge. Front leg- knee over ankle, parallel thigh. Back leg- lifted knee, pressing heel away. Arms- lifted over head and shoulder width.

Easier Variation 

  • If you have trouble balancing, have a chair by your side and use the back to hold onto as you need it. Or take your feet wider than hip width apart. 
  • Make your stride shorter to ease the difficulty of the lunge. 
  • The arms don't have to go over head. They can stay on the hips or come to Prayer position at the heart. 
    Easier version. Straighter front leg. Lowered arms. 
Difficult Variation 

  • To make the lunge more challenging for those gladiator quadriceps of yours, make your stride longer so the front thigh becomes parallel to the floor. 
  • Think about the thighs squeezing into line that runs down the centre of your mat. GET THOSE QUADS WORKING! 
  • You can also take the arms into a light backbend by letting them reach backwards and lifting the chest upwards.  
    Difficult version. Deeper lunge, little backbend in the spine. 

Monday 22 September 2014

Fancy a forward fold?

Sanskrit name

  • Uttanasana 

Meaning

  • Intense stretch 
Benefits
  • Stretches the hamstrings and back of the knees
  • Reduces fatigue 
  • Calms the brain and relieves mild stress and anxiety
  • Aids digestion by massaging the stomach and activating the liver and kidneys
  • Good for asthma, osteoporosis and high blood pressure 
Cautions
  • Back injuries 
  • Hamstring injuries 
Anatomy focus
  • Lower body- Ankle dorsiflexion; Knee in neutral extension; Hip flexion 
  • Upper body- Neutral extension and lengthening of spine
Step by Step
  • Start in Mountain pose (Tadasana) from last weeks breakdown
  • Have the feet hip width apart and feel the eveness of the feet while gently spread the toes
  • With the spine beautifully tall, start to hinge forward from the hips by leading with the sternum and tucking the abdominals towards the spine
  • Stop when you start to feel your hamstring engage and keep the back as straight as you can, make sure your knees are not locking or hyperextending
  • Breath here and let the stretch soften

First main stage of working into a deeper Uttanasana
  • Start to go further when you feel comfortable, keeping the back as straight as you can and stopping when it starts to round
  • Feel free to bend the knees slightly if your hamstring are really tight or there is any niggling in the lower back
  • Take the hands to the thighs, shins, ankles or floor
  • Make sure you weight is still even throughout the whole of the foot and you're not leaning into the heels or toes too much (if you feel a lot of pressure in a certain area, gently shift your weight around to find the best position or widen your stance slight) 
  • Only go as far as comfortable and breath for as many breaths you like ( make sure nothing goes numb or you get pins and needles though!) 
Uttanasana with bent knees to protect the hamstrings and lower back
  • To come out, bend the knees deeply, tuck the chin into the chest and roll the spine back up on an inhale 
Easier Variations
  • Stand near a wall with enough space to lean forward and place you hands on the wall and have your back parallel to the floor 
  • Start in Mountain once again 
  • Hinge forward at the hips, keeping the spine straight, tucking the abdominals towards the spine and place the hands on the wall
  • Keep the knees are straight as possible but DON'T lock or hyperextend them
  • Imagine yourself at a right angle and pressing equally through the hands and feet
  • Breath for as long as possible, coming out the same ways as described above
My personal favourite way to practice a great quality Uttanasana before working deeper into the fold

Difficult Variations 
  • Try taking the feet closer together (making sure theres no added pressure in the knees)
  • Sink the chest towards the knees and almost let the belly sink in between top of the thighs
  • Take the hands behind the feet on the floor and wrap the hands around the calves
  • Drop the crown of the head towards the floor and look behind or close the eyes
Things to think about 
  • Feeling steady and grounded through the feet 
  • Feel the back of the legs reach for the sky while the torso is pulled down by gravity keeping the body in equilibrium


Tuesday 16 September 2014

Firm foundation with Mountain


Sanskrit name

  • Tadasana 

Meaning

  • Mountain
Benefits
  • Grounding
  • Improved posture 
  • Alleviates flat footedness and sciatica 
  • Strengthens ankles, knees, thighs, gluteals and abdominals 
Cautions
  • Headache 
  • Low blood pressure 
Anatomy focus
  • Lower body- Ankle dorsiflexion; Knee in neutral extension; Hip adduction and neutral extension
  • Upper body- Neutral extension of spine; Forearm pronation 
Step by Step
  • Come to standing
  • Take the feet hip width apart
  • Lift all the toes up and then spread them as far out as you can before putting them back down
  • Keep the knee soft and make sure they're not hyperextending or locking
  • Feel the guteals and abdominals start to engage as you lengthen the spine upwards. 
  • Make sure to not stick the bum out like a duck. Lengthen the lower back by imagining the spine also lengthening downwards
  • Gently lift the chest as the shoulder blades sink down the back and open the ribs to breath effortlessly 
  • Keep the back of the neck long and the crown of the head continuing to the lengthen the spine by drawing the crown towards the sky
  • Chin parallel to the floor
  • Arms are down by the sides but hands are active. You can either have the hands facing the body or turned out to the front.
  • Breath using the diaphragm by filling the lungs from the bottom to the top in the chest naturally, don't force the breath or cause light headedness    
  • Stand as long as comfortable using a natural deep breath

Easier Variations 
  • Stand with your back against a wall if your balance is a bit wobbly


Difficult Variations 
  • Close your eyes to try and balance without the aid of sight and depending on the outside environment 

What to think about 

Diagram- Representing the arches of the feet and how the weight
should be evenly distributed. Leslie Kaminoff's 'Yoga Anatomy'.
  • Feel the steady, evenness of the body centred through the feet. Feel the three arches of the foot in harmony and the toes evenly spread 
  • Feel the weight of the body moving centrally through the bones of the legs and creating the firm foundation of Mountain 
  • Now continue the evenness to move up the spine and to the crown of the head. Allowing the crown of the head to rise until it touches the sky like the mighty Mount Everest 
  • Having the hands active and open means you can be mindful to any emotions that may arise and accept them as they are 
  • Breath to fill the whole body and nourish the bones and muscles with each inhale